Car Paint Protection Film Installation Process: Step-by-Step Guide
Protecting your vehicle’s paint is essential for maintaining its value and appearance over time. Car paint protection film installation offers an effective barrier against scratches, stone chips, and environmental damage. Whether you’re a beginner looking for a DIY car paint protection film installation guide or considering professional help, understanding the paint protection film step by step process can help you make the best decision for your vehicle. This article will walk you through the PPF install process, explain key steps, and share tips to ensure your car stays looking pristine.

What is Paint Protection Film?
Paint protection film, also known as a clear bra or vehicle paint guard, is a transparent, durable layer applied to your car’s painted surfaces. It shields your vehicle from physical damage such as minor scratches, rock chips, and chemical stains. The film is made from a strong, flexible polymer designed for long-term protection without affecting your car’s appearance or color. Many car owners choose this over traditional wax or ceramic coatings because it offers physical defense rather than just a protective layer. To learn more about different options, check out Types of Paint Protection Film to find the best fit for your needs.
Understanding the Car Paint Protection Film Installation Process
The car paint protection film application requires precision and patience. Whether you choose a professional service or attempt a DIY car paint protection film installation, it’s essential to follow the paint protection film installation steps carefully to avoid bubbles, wrinkles, or peeling. Here’s a stepwise guide for car paint protection film application that covers the basic process.
Step 1: Preparing the Car Surface
Before installing the film, thorough cleaning is critical. Wash your car with soap and water, then use a clay bar to remove contaminants and debris that could interfere with adhesion. Dry the surface completely to avoid trapping moisture under the film. This preparation is vital for a smooth paint protection film mounting and ensures longevity.
Step 2: Cutting the Film to Size
While some prefer to cut the film by hand, most professionals use pre-cut templates designed specifically for different car models. This ensures perfect coverage for areas like the hood, fenders, mirrors, and bumpers. If you are doing a car PPF fitting yourself, take extra care to measure accurately and cut with a sharp blade.
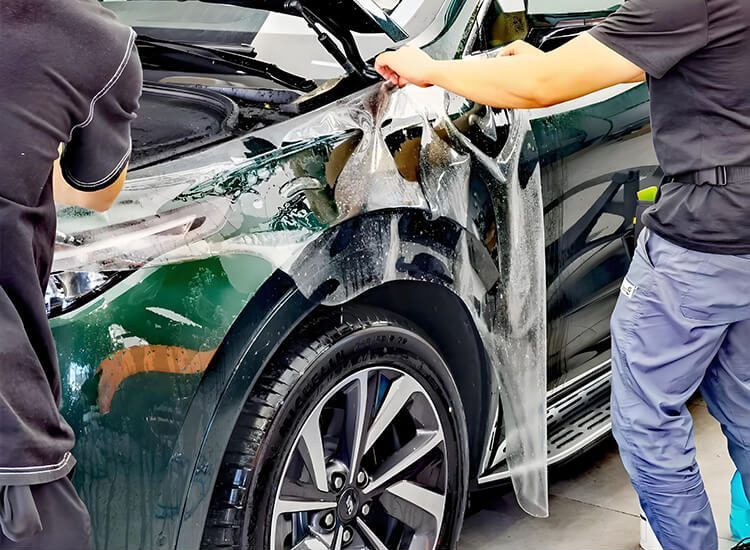
Step 3: Applying the Film
The paint protection film setup involves spraying a solution (usually a mix of water and soap) on the adhesive side of the film and the car surface. This allows you to reposition the film easily before final placement. Slowly lay the film onto the surface, starting from one edge and working your way across. Use a squeegee to press out bubbles and excess water, ensuring the film adheres tightly.
Step 4: Trimming and Finishing
Once the film is properly aligned and smooth, trim any excess edges using a sharp blade. Pay special attention to corners and curves where the film might peel if not cut and sealed properly. Allow the film to cure; this can take from a few hours to a couple of days depending on temperature and humidity. During this time, avoid washing the car or exposing it to harsh conditions. Understanding Car Paint Protection Film Lifespan can help you know when to replace or maintain your film.

Tips and Tricks for a Successful Installation
Knowing the right techniques and tools can make your car paint protection film installation much easier. Using a high-quality paint protection film installation kit with squeegees, spray bottles, and blades designed for PPF helps achieve professional results. Avoid stretching the film too much, as this can cause distortion or peeling. If you’re unsure about the best way to apply paint protection film on a car, consider watching detailed car paint protection film installation videos to familiarize yourself with the process.
Common Mistakes During Paint Protection Film Installation
One of the most frequent problems is trapping dust or air bubbles under the film. These issues can lead to peeling or cloudiness over time. Another mistake is rushing the drying and curing phase, which can reduce the film’s lifespan. Be patient and meticulous—this will pay off in a more durable and visually pleasing finish. If you’re a beginner, following paint protection film installation instructions carefully is critical to avoid costly errors.
Professional Installation vs. DIY
While a professional paint protection film installation process ensures expert results and warranty coverage, many car enthusiasts prefer to save money by doing it themselves. However, professional installers have the experience and tools to handle complex curves and edges without damaging the film or paint. The cost and process of car paint protection film install vary widely depending on the car model, film quality, and whether you choose DIY or professional services. For more on expenses, check the detailed breakdown in PPF Coating Cost. If you want the best results and longer-lasting protection, a professional installation is usually worth the investment.
How Long Does Paint Protection Film Installation Take?
Typically, a full installation can take anywhere from a few hours to a full day depending on the vehicle size and the complexity of the job. Simple partial wraps or smaller areas may take less time. It’s important to factor in drying time as well before driving or washing your car. Asking paint protection film installation services about time estimates before booking can help you plan accordingly.
A well-installed paint protection wrap install can keep your car looking new for years by protecting its paint from chips, scratches, and stains. Whether you choose a professional or a DIY approach, understanding the paint film application process and following a detailed step-by-step guide improves your chances of success. Always prepare your surface thoroughly, take your time with positioning, and use the right tools. For insights on top products to consider, explore the Top 12 PPF Brands For Cars. By doing so, you’ll maximize the protective benefits of the film and maintain your car’s showroom shine. You can also learn about the Top 5 Benefits of Car Paint Protection Film to better understand why it’s a smart investment.
Ready to Protect Your Car with a Low-Cost Solution
PreproPPF offers high-quality Clear PPF PR-Q01 at wholesale prices worldwide, directly from our factory in China. Enjoy free door-to-door shipping and superior protection for your vehicle’s paint. Don’t wait—visit our product page now and order your Clear PPF PR-Q01 to keep your car looking flawless!

Frequently Asked Questions (FAQs)
Q1: How much does car paint protection film installation cost?
The cost varies based on the vehicle size, film quality, and installation complexity. Professional installation typically ranges from a few hundred to over a thousand dollars.
Q2: How long does paint protection film installation take?
Installation time can be from 4 hours up to a full day, depending on the area covered and the installer’s experience.
Q3: Can I install paint protection film myself?
Yes, with the right tools and patience, a DIY installation is possible, but professional installation usually yields better, longer-lasting results.
Q4: What are common mistakes during paint protection film installation?
Common mistakes include trapping air bubbles, improper surface cleaning, stretching the film excessively, and rushing the curing time.